Online shopping Let's make healthy choices for cooking
Cooking king teaching full course
Best online shopping
Shop here link now
चिकन बिरयानी: एक स्वादिष्ट और लोकप्रिय भारतीय व्यंजन

चिकन बिरयानी भारत का एक पारंपरिक और बेहद लोकप्रिय व्यंजन है। यह व्यंजन मुख्य रूप से चिकन, बासमती चावल, मसाले, और अन्य सामग्री से तैयार किया जाता है। बिरयानी को उसके विशेष स्वाद, खुशबू, और बनावट के लिए जाना जाता है, और यह भारत के विभिन्न हिस्सों में अलग-अलग तरीकों से बनाई जाती है।

बिरयानी का इतिहास भी बहुत दिलचस्प है। ऐसा माना जाता है कि बिरयानी का उद्गम भारत में मुगल साम्राज्य के समय हुआ था। यह एक रॉयल व्यंजन माना जाता था, जिसे शाही भोज में प्रस्तुत किया जाता था। धीरे-धीरे, यह व्यंजन आम जनता में भी लोकप्रिय हो गया और इसके विभिन्न रूप देश के अलग-अलग हिस्सों में विकसित हुए, जैसे हैदराबादी बिरयानी, लखनवी बिरयानी, और कोलकाता बिरयानी।

सामग्री
चिकन बिरयानी बनाने के लिए निम्नलिखित सामग्री की आवश्यकता होती है:

500 ग्राम बासमती चावल
1 किलो चिकन (हड्डी सहित)
4 बड़े प्याज (पतले कटे हुए)
2 बड़े टमाटर (बारीक कटे हुए)
1 कप दही
2 बड़े चम्मच अदरक-लहसुन का पेस्ट
4-5 हरी मिर्च (कटे हुए)
1/2 कप ताजा हरा धनिया (कटे हुए)
1/2 कप पुदीना पत्तियां (कटे हुए)
1/2 कप दूध
1/4 चम्मच केसर (दूध में घुला हुआ)
3 बड़े चम्मच घी या तेल
नमक स्वादानुसार
मसाले:
2 चम्मच लाल मिर्च पाउडर
1 चम्मच हल्दी पाउडर
2 चम्मच धनिया पाउडर
1 चम्मच गरम मसाला पाउडर
4-5 हरी इलायची
2-3 लौंग
1 इंच दालचीनी का टुकड़ा
2 तेज पत्ते
1 चम्मच जीरा
विधि
1. चावल की तैयारी:
सबसे पहले, बासमती चावल को धोकर 30 मिनट के लिए पानी में भिगो दें। इसके बाद, एक बड़े बर्तन में पानी उबालें और उसमें थोड़ा सा नमक और जीरा डालें। जब पानी उबलने लगे, तब उसमें भीगे हुए चावल डालें और 70-80% पकने तक उबालें। इसके बाद चावल को छानकर एक तरफ रख दें।

2. चिकन की तैयारी:
अब चिकन को अच्छी तरह धोकर साफ करें। एक बड़े बर्तन में घी या तेल गरम करें और उसमें प्याज डालकर सुनहरा भूरा होने तक भूनें। प्याज को बाहर निकालकर अलग रख दें, और उसी तेल में तेज पत्ता, इलायची, लौंग, और दालचीनी डालकर भूनें। अब इसमें अदरक-लहसुन का पेस्ट डालकर कुछ समय तक भूनें।

इसमें कटे हुए टमाटर और हरी मिर्च डालें और तब तक पकाएं जब तक टमाटर नरम न हो जाएं। अब इसमें चिकन के टुकड़े डालें और अच्छे से मिलाएं। इसमें दही, लाल मिर्च पाउडर, हल्दी पाउडर, धनिया पाउडर, और नमक डालकर मिलाएं। चिकन को धीमी आंच पर ढककर पकाएं जब तक वह 70-80% पक न जाए।

3. बिरयानी की परत लगाना:
अब एक बड़े बर्तन में सबसे पहले आधे पके हुए चावल की परत बिछाएं। उसके ऊपर आधे पकाए हुए चिकन का मिश्रण डालें। इसके ऊपर थोड़ा ताजा हरा धनिया, पुदीना पत्तियां, और भुने हुए प्याज डालें। इसके बाद बचा हुआ चावल और फिर से चिकन की परत लगाएं। अंत में बचा हुआ हरा धनिया, पुदीना पत्तियां, भुने हुए प्याज, और केसर मिला हुआ दूध डालें।

4. दम देना:
अब बर्तन को अच्छी तरह से ढककर, धीमी आंच पर 20-25 मिनट तक दम दें। अगर आप चाहें तो बर्तन के ढक्कन के चारों ओर आटा लगाकर उसे पूरी तरह सील कर सकते हैं ताकि भाप बाहर न निकल सके। जब बिरयानी तैयार हो जाए, तब इसे हल्के से मिलाएं ताकि चावल और चिकन की परतें एकसमान हो जाएं।

5. परोसना:
चिकन बिरयानी को गर्मागर्म परोसें। इसे ताजे दही या रायता, सलाद, और पापड़ के साथ परोसना एक बेहतरीन विकल्प है। बिरयानी का हर निवाला आपके मुंह में खुशबू और स्वाद का संगम लाएगा।

बिरयानी के प्रकार
भारत में बिरयानी के कई प्रकार पाए जाते हैं, जिनमें से हर एक की अपनी खासियत होती है।

हैदराबादी बिरयानी: हैदराबादी बिरयानी को पारंपरिक रूप से कच्चे मांस और चावल के साथ पकाया जाता है। इसमें तेज मसालों का उपयोग किया जाता है और यह बहुत ही मसालेदार होती है।
लखनवी बिरयानी: लखनवी बिरयानी की खासियत इसकी सौम्यता और सुगंध में होती है। इसमें मसालों का उपयोग थोड़ा कम होता है, और यह मटन या चिकन के साथ तैयार की जाती है।
कोलकाता बिरयानी: कोलकाता बिरयानी की पहचान उसमें डाले जाने वाले आलू से होती है। इसमें हल्के मसाले और केसर का उपयोग किया जाता है।
चिकन बिरयानी की खासियत
चिकन बिरयानी की खासियत उसकी बहुस्तरीय संरचना और अद्वितीय स्वाद में निहित है। चावल और चिकन की परतों के बीच केसर और मसालों का मिश्रण, बिरयानी को एक विशेष महक और स्वाद देता है। यह व्यंजन एक ऐसा अनूठा अनुभव प्रदान करता है, जिसमें हर बाइट के साथ नए स्वाद का अनुभव होता है।

बिरयानी को बनने में समय लगता है, लेकिन इसका स्वाद इंतजार को पूरी तरह से सार्थक बनाता है। बिरयानी का प्रत्येक तत्व जैसे चावल की खुशबू, मसालों का तीखापन, और चिकन का रसदारपन, सभी मिलकर इसे एक पूर्ण और संतुलित भोजन बनाते हैं।

उपसंहार
चिकन बिरयानी भारतीय व्यंजनों का एक अनमोल हिस्सा है। इसका स्वाद और सुगंध भारतीय मसालों की समृद्धि का प्रतीक है। यह व्यंजन न केवल भारत में बल्कि पूरी दुनिया में पसंद किया जाता है। चाहे कोई खास मौका हो या फिर घर पर परिवार के साथ का समय, चिकन बिरयानी हमेशा से ही हर किसी की पसंदीदा रही है। इसके हर निवाले में आपको भारतीय संस्कृति और स्वाद का अनुभव होगा।

तो अगली बार जब भी आप कुछ विशेष पकाना चाहें, तो चिकन बिरयानी को अपने मेन्यू में जरूर शामिल करें और इसका आनंद उठाएं।
Step 1: How to Make Breaded Chicken Wings
Let's start with a video from my cooking YT channel, it shows the whole process and is very easy to follow.
Digi shop
Breaded Chicken Wings | Pan Fried
208
3
Featured
Introduction: Breaded Chicken Wings | Pan Fried


Deep fried or pan fried breaded chicken wings are one of the dinners my kids love. But we all know that fried food isn't exactly the healthiest in the world, so I'm not cooking this dish too often. But once in a while... that works, right? :)
The recipe I'm about to show you is very easy, I'm using the most basic breading technique but to give the wings a bit more flavor, I do season them before applying the breading.
French fries and a tasty coleslaw salad will serve as the sides today. Now let's cook!
Supplies


The list of ingredients for this recipe is on the shorter side, as you can see below.
The amount of wings is just about right for my family of 2 adults and 3 kids.
15 chicken wings
1 cup flour (all purpose)
1 cup cornstarch
3-4 eggs
2 cups breadcrumbs
4 tablespoons olive oil
1-2 teaspoons garlic powder
1 teaspoon red paprika
salt & pepper to taste
vegetable oil for frying
I'm sure you have all the ingredients at home, right?
The first thing we need to do is to divide the chicken wings into 2 pieces, by cutting through the joint. I have already removed the tips, since there is no meat on those anyways.
Season the wings with 3 or 4 tablespoons of olive oil, 1-2 teaspoons of garlic powder, a generous amount of salt and black pepper. Finish it up with a teaspoon of red paprika.
Mix everything properly, paprika will help us as a marker... once all the pieces are red, you know you mixed well :)
Step- 3
Beat the eggs and season with salt & pepper. You will also need all purpose flour and breadcrumbs.
And now to the breading, it's very simple. First dip the wings in flour, eggs come next and the breadcrumbs at the end. Don't go too heavy with the breadcrumbs, we don't want a very thick breading layer.
Step - 4
Time to fry
Heat up a generous amount of oil in a pan, pick a type with a high smoking point such as canola. You need enough oil so that even the largest pieces of chicken are at least halfway submerged in it.
Fry on medium high, flip the pieces a few times and move them around the pan. The oil is always the hottest in the center of the pan so by moving the wings around you ensure an even cook.
Step -5
Wings of ready
Once the wings are golden brown, it's time to take them off the pan. Place them in a bowl with a paper towel in it, to absorb some of the fat. And continue with the second batch.
Step 6: Time to Serve


As mentioned above, I'm using simple French fries as the side and I don't think it's necessary to explain how those are made, right? I think some salad goes really well
Shopping Centre shop Now
Click here to link
Chicken and Mushroom Veloute Recipe.
This is a French recipe on how to make a Veloute sauce which can be used as a filling when making pies and other dishes. The flavors can vary and you can use any white cooking stock. The sauce works great with chicken stock but using fish stock instead will allow you to make lovely seafood pies too!
If you want to have a thicker sauce, simply use more butter and flour to make your roux.
Step 1: Gather Your Ingredients
For this recipe you will need the following: (based on 1 liter of stock)
1 Liter of Chicken Stock
50 to 70 grams of good quality butter
50 to 70 grams of good quality Flour
100 grams of Double cream
200 to 250 grams of button Mushrooms
a few pinch of parsley
for the seasoning:
salt
White pepper or cayenne pepper (up to your liking)
Step 2: Make a White Roux
Put the butter in a saucepan
put your saucepan on the stove on a low fire and let the butter melt slowly.
When the butter is fully melted immediately add all of the flour to the butter and mix well using a wooden spoon.
Let the mix cook on a very low heat for 3 to 4 minutes maximum.
After 3 to 4 minutes, take you saucepan of the heat and scoop out the roux mix in a bowl or small container.
Leave the roux mix in the container and let it cool down until cold.
Step 3: Bring Your Stock to the Boil
Pour all of your chicken stock in a saucepan
Place the saucepan on the stove on high heat
Then bring the stock to the boil.
Step 4: Start the Veloute
Use a clean medium size saucepan
And add the (cold) roux mix you made earlier in the Saucepan.
Of the heat pour half of the boiling chicken stock on the white roux in the saucepan.
Stir gently with a whisk making sure all of roux is dissolved and blends with the stock.
Add now the rest of the boiling stock to the mix and stir well.
Step 5: Bring the Veloute to the Boil
Place the saucepan containing the mix on high heat and bring the Veloute to the boil.
When the first boils appears, stir gently for 2 or 3 minutes while the mix starts to thicken.
Now turn down the heat down to very low heat and let your veloute simmer for 15 minutes (stirring occasionally)
Step 6: Saute Your Mushroom
While you Veloute is simmering:
Cleanse your button mushrooms under running water then pat them dry.
Cut to top of the stokes of each mushrooms then cut the mushroom in quarters.
When done, pour some oil in a frying pan and place the pan on the stove on a medium -high heat.
When the oil is hot add the mushrooms in the pan then season your mushrooms Quarters to taste.
Let the mushrooms sizzle until they have a slight coloration, (they should remains mostly blondish in color.)
when cooked, put the mushroom aside in a small container.
Step 7: Season and Finish Your Veloute
After your veloute has finished simmering, take the saucepan of the heat.
and season your veloute to taste using salt and pepper.
Now add the saute mushrooms and the double cream and stir gently.
Finish off by adding a pinch or two or freshly chopped parsley in the mix and your are done.
Step 8: Your Veloute Is Now Ready
You can now use your veloute (pie mix) as it is or even go further and add pieces or chicken in the mix for an even grater taste.
Enjoy.
Quick Roast Chicken
This recipe is as basic as it gets - with just 5 minutes of prep time, you can pull the finished roast chicken out of the oven in roughly 45 minutes. Give it a try! This recipe is based on the simple roast chicken
Step 1: Gather Tools and Ingredients
You'll need:
- one chicken
- a paper towel
- large-grain salt (kosher or large-flake sea salt are fine)
- pepper
- a clean (and cleanable) surface to work on (I use the interior of the butcher paper the chicken came in)
- a piece of clean natural kitchen twine long enough to truss the chicken, at least 30 inches. Use cotton, hemp, etc - nothing that will melt, discolor, or otherwise isn't fit for contact with food and/or heat.
- an oven-proof pot
- an oven
- meat thermometer, preferably instant-read
- soap and water to clean yourself up
- bleach to clean any bits of counter contaminated with raw chicken
- a sharp knife or kitchen shears
- a spoon
Step 2: Preheat Oven and Pan
Step 3: Dry Chicken
We're aiming for crispy skin, and any remaining water will turn into steam. Rather counterproductive, so do a good job toweling off.
Step 4: Salt Body Cavity
Step 5: Truss Chicken
This step helps create one large thermal mass so the chicken cooks evenly.
Step 6: Salt and Pepper Chicken
If you want to add other dried herbs and spices, now's a great time. I've had great results with Ethiopian berebere. (if you've got fresh herbs, save them for later.
Step 7: Drop Into Hot Pan
Quick Roast Chicken
141,053
115
38
Featured
Introduction: Quick Roast Chicken


Roasting is a simple, classic way to cook a chicken, and the resulting birds are delicious every time.
This recipe is as basic as it gets - with just 5 minutes of prep time, you can pull the finished roast chicken out of the oven in roughly 45 minutes. Give it a try! This recipe is based on the simple roast chicken from Bouchon by Thomas Keller.
Cross-reference: How to Truss a Chicken.
Step 1: Gather Tools and Ingredients

You'll need:
- one chicken
- a paper towel
- large-grain salt (kosher or large-flake sea salt are fine)
- pepper
- a clean (and cleanable) surface to work on (I use the interior of the butcher paper the chicken came in)
- a piece of clean natural kitchen twine long enough to truss the chicken, at least 30 inches. Use cotton, hemp, etc - nothing that will melt, discolor, or otherwise isn't fit for contact with food and/or heat.
- an oven-proof pot
- an oven
- meat thermometer, preferably instant-read
- soap and water to clean yourself up
- bleach to clean any bits of counter contaminated with raw chicken
- a sharp knife or kitchen shears
- a spoon
Step 2: Preheat Oven and Pan

Turn your oven to 450F, and set the rack to the middle or low position. Put your pan in the oven to heat as well.
Step 3: Dry Chicken

This step is easy to forget, but key to success. Simply dry the chicken thoroughly, inside and out. Pay special attention to the body cavity, as the uneven surfaces let moisture hide.
We're aiming for crispy skin, and any remaining water will turn into steam. Rather counterproductive, so do a good job toweling off.
Step 4: Salt Body Cavity

Pour about a teaspoon of salt into the body cavity, and rub against the insides. Dump out any extra salt.
Step 5: Truss Chicken

If you've never trussed a chicken before, try it - it's easy, and only takes a minute. I posted a separate trussing Instructable here. If you already know how, grab your twine and truss away.
This step helps create one large thermal mass so the chicken cooks evenly.
Step 6: Salt and Pepper Chicken
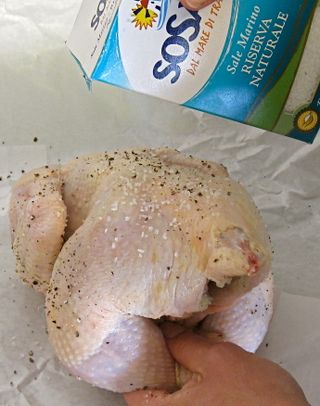

Grind fresh pepper over the surface of the chicken, and cover it in a light rain of salt. (More like hail, I suppose.)
If you want to add other dried herbs and spices, now's a great time. I've had great results with Ethiopian berebere. (if you've got fresh herbs, save them for later.)
Step 7: Drop Into Hot Pan

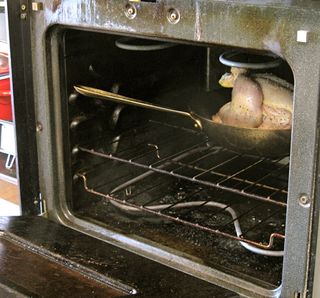
Open the oven, pick up the trussed, seasoned bird by the ankles, and place it breast-side up in the hot pan. It will sizzle a bit, but if you've dried the chicken it shouldn't spit.
Step 8: Cook


Cook the chicken at 450F for around 45 minutes, depending on the size of the bird. You'll be able to tell when it's near-done - the bird will be golden-brown and smell awesome.
To test, put your instant-read thermometer in the fleshy bit between thigh and body, and pull the bird out when you get a reading of 155F. (The temperature will rise to about 165F as the bird rests.)
Notes:
1) Keep your thermometer away from the bones, as they will hold more heat and throw off your readings. Test multiple spots if you're not sure.
2) If the top seems to be drying out, or if you've added extra spices that look to be getting too toasty, it's fine to baste the bird with a spoonful of chicken fat from the pan as necessary, but you probably won't need it.
Step 9: Finish and Serve

Immediately after removing the chicken, baste the top with pan drippings. If you have fresh herbs to add (thyme, oregano, etc) add them to the pan drippings and let them steep for a moment before basting. Snip the twine around the chicken legs, and gently unwrap from the rest of the body. (it will come off easily.)
I generally start eating bits (wings, tail) now, but if you want to be formal:
Baste again, let the bird rest about 10 minutes, then baste once more before serving. It looks gorgeous, so make a big production of carving it at the table
Banner cooking king advertising
Chicken Chile Verde
Step 1: Chop Veggies
3-4 onions
handful of hot peppers (to your spice preference)
2 bell peppers (I picked red, but green is fine and fits the color scheme)
Saute the veggies in canola oil, and add a bit of black pepper. Stir until they've softened and begin to brown
Step 2: Add Chicken
Remove bones and fat, chop into bite-size pieces, and add to pot. Stir as necessary as the chicken browns. You can up the meat/veg ratio if you prefer; 2lbs is really the minimum, though.
*This recipe is traditionally made with pork, but we're pretending to be healthy by using chicken. You don't really need to do anything different to swap meats.
Step 3: Add Tomatillos
Step 4: Season and Simmer

Seasonings:
handful garlic, coarsely chopped
black pepper (to taste)
1c stock* or 2 boullion cubes
~1T cumin
sprinkle of allspice
Stir as necessary. The tomatillos will drop a huge quantity of water, which needs to cook off to give a proper stew consistency. Leave the pot on medium/low at the back of the stove to simmer, and stir as needed to prevent sticking.
*see pressure cooker beef stock for instructions on making your own; you may substitute chicken or turkey bones without changes.
Step 5: Finish and Serve
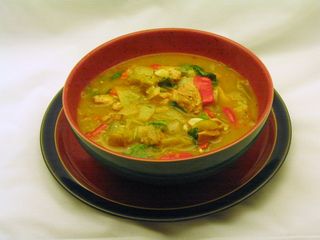
When the liquid has cooked down and the meat is just about ready to fall apart, do some last-minute tasting. This is the time to add more cumin, some extra garlic, a dash of hot sauce, another boullion cube, extra salt, or anything else that will finish out the flavor properly.
Turn the heat off, and stir in a coarsely-chopped handful of cilantro.
Serve warm. The flavor gets better after sitting in the fridge overnight.
This was a collaboration with my mother, who did lots of chopping, photographing, and tasting.
कोई टिप्पणी नहीं:
एक टिप्पणी भेजें